Appearance
使用初探
渲染脚本
单独的 canvas 组件仅仅是一个透明矩形,我们需要通过渲染脚本来进一步操作。
首先通过 $refs 和 id 来获取 canvas 组件节点,创建的 canvas 绘图类是一个 CanvasRenderingContext2D 对象。
在后续功能中操作该对象即可绘制图形。
例如:
点击查看源码
js
const ctx = this.$refs.canvasView执行绘制命令
执行绘制命令后,必须调用drawAction()。传一个string类型,可以是任意字符串。
例如:
点击查看源码
js
ctx.drawAction('String');绘制
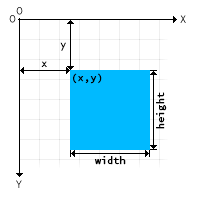
开始画图之前,需要了解一下画布的坐标系。
如下图所示,坐标系原点为左上角(坐标为(0,0))。所有元素的位置都相对于原点定位。x 轴向右递增,y 轴向下递增。
填充绘制(fill)
canvas 绘图的基本绘制方式之一是填充绘制。
填充是指用指定的内容填满所要绘制的图形,最终生成一个实心的图案。
描边绘制(stroke)
canvas 绘图的另一种基本绘制方式是描边绘制。
描边绘制是指,沿着所要绘制的图形边缘,使用指定的内容进行描绘,最终生成的是空心的图案。
如果既要填充又要描边,则需要分别绘制两次完成最终图案。
绘制图形
绘制矩形
矩形,是最基础的形状。canvas 提供了三种方法绘制矩形
点击查看源码
js
//填充绘制矩形
ctx.fillRect(x, y, width, height)

//描边绘制矩形
ctx.strokeRect(x, y, width, height)

//擦除矩形区域,相当于用白色底色填充绘制
ctx.clearRect(x, y, width, height)
绘制路径
路径,是另一种基础形状。通过控制笔触的坐标点,在画布上绘制图形。
与绘制矩形的直接绘制不同,绘制路径需要一些额外的步骤。
- 首先,需要创建路径起始点。
- 然后,你使用各种路径绘制命令去画出路径。此时路径是不可见的。
- 根据需要,选择是否把路径封闭。
- 通过描边或填充方法来实际绘制图形。
为此,我们需要了解以下一些基本方法。
beginPath()
开始一条新路径,这是生成路径的第一步操作。
一条路径本质上是由多段子路径(直线、弧形、等等)组成。而每次调用 beginPath 之后,子路径清空重置,然后就可以重新绘制新的图形。
closePath()
闭合当前路径。
closePath() 不是必须的操作,相当于绘制一条当前位置到路径起始位置的直线子路径。
stroke()
描边绘制当前路径。
fill()
填充绘制当前路径。
当调用 fill() 时,当前没有闭合的路径会自动闭合,不需要手动调用 closePath() 函数。调用 stroke() 时不会自动闭合。
moveTo(x, y)
移动笔触。将当前路径绘制的笔触移动到某个坐标点。
相当于绘制一条真正不可见的子路径。通常用于绘制不连续的路径。
调用 beginPath() 之后,或者 canvas 刚创建的时候,当前路径为空,第一条路径绘制命令无论实际上是什么,通常都会被视为 moveTo。因此,在开始新路径之后建议通过 moveTo 指定起始位置。
路径绘制命令
路径绘制命令是实际绘制路径线条的一些命令。包括有:
- 绘制直线:
lineTo - 绘制圆弧:
arc、arcTo - 贝塞尔曲线:
quadraticCurveTo、bezierCurveTo - 矩形:
rect
这些命令都是用来绘制不同子路径的命令。
组合使用 效果预览
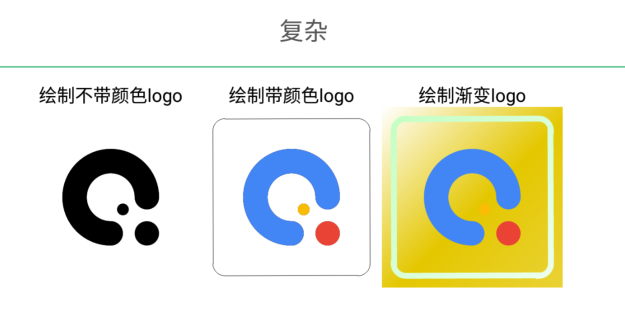
组合使用的效果,绘制一个快应用的 logo。
点击查看源码
js
	const ctx = this.$refs.canvasView;
    ctx.beginPath();
    ctx.moveTo(h / 2 + s, h / 2);
    ctx.arc(h / 2, h / 2, s, 0, -p / 2 * 3, true);
    ctx.arc(h / 2, h / 2 + s + s / 2, s / 2, -p / 2, p / 2, false);
    ctx.arc(h / 2, h / 2, s * 2, -p / 2 * 3, 0, false);
    ctx.arc(h / 2 + s + s / 2, h / 2, s / 2, 0, p, false);
    ctx.moveTo(h / 2 + s * 2, h / 2 + s + s / 2);
    ctx.arc(h / 2 + s + s / 2, h / 2 + s + s / 2, s / 2, 0, p * 2, false);
    ctx.moveTo(h / 2 + s / 4 * 3, h / 2 + s / 2);
    ctx.arc(h / 2 + s / 2, h / 2 + s / 2, s / 4, 0, p * 2, false);
    ctx.fill();
    ctx.beginPath();
    ctx.moveTo(h / 2 + s, h / 2);
    ctx.arc(h / 2, h / 2, s, 0, -p / 2 * 3, true);
    ctx.arc(h / 2, h / 2 + s + s / 2, s / 2, -p / 2, p / 2, false);
    ctx.arc(h / 2, h / 2, s * 2, -p / 2 * 3, 0, false);
    ctx.arc(h / 2 + s + s / 2, h / 2, s / 2, 0, p, false);
    ctx.fill();
    ctx.drawAction('绘制logo');
颜色和样式
通过刚才的例子,我们学会了绘制图形。
但是我们看到,不管是填充还是描边,画出来的都是简单的黑白图形。如果想要指定描绘的内容,画出更丰富的效果应该如何操作呢?
有两个重要的属性可以做到,fillStyle 和 strokeStyle。顾名思义,分别是为填充和描边指定样式。
颜色
在本章节最初的例子里,其实已经看到上色的基本方法,就是直接用颜色作为指定样式。
点击查看源码
js
ctx.fillStyle('rgb(200,0,0)')
ctx.fillRect(20, 20, 200, 200)
一旦设置了 fillStyle 或者 strokeStyle 的值,新值就会成为新绘制的图形的默认值。如果你要给每个图形上不同的颜色,需要画完一种样式的图形后,重新设置 fillStyle 或 strokeStyle 的值。
点击查看源码
js
//填充绘制一个矩形,颜色为暗红色
ctx.fillStyle('rgb(200,0,0)')
ctx.fillRect(20, 20, 200, 200)

//描边绘制另一个矩形,边框颜色为半透明蓝色
ctx.strokeStyle('rgba(0, 0, 200, 0.5)')
ctx.strokeRect(80, 80, 200, 200)
canvas 的颜色支持各种 CSS 色彩值。
点击查看源码
js
// 以下值均为 '红色'
ctx.fillStyle('red') //色彩名称
ctx.fillStyle('#ff0000') //十六进制色值
ctx.fillStyle('rgb(255,0,0)') //rgb色值
ctx.fillStyle('rgba(255,0,0,1)') //rgba色值
渐变色
除了使用纯色,还支持使用渐变色。先创建渐变色对象,并将渐变色对象作为样式进行绘图,就能绘制出渐变色的图形。
渐变色对象可以使用 createLinearGradient 创建线性渐变,然后使用 addColorStop 上色。
这里要注意的是,渐变色对象的坐标尺寸都是相对画布的。应用了渐变色的图形实际起到的是类似“蒙版”的效果。
点击查看源码
js
//填充绘制一个矩形,填充颜色为深红到深蓝的线性渐变色
const linGrad1 = ctx.createLinearGradient(0, 0, 300, 300)
linGrad1.addColorStop(0, 'rgb(200, 0, 0)')
linGrad1.addColorStop(1, 'rgb(0, 0, 200)')
ctx.fillStyle(linGrad1)
ctx.fillRect(20, 20, 200, 200)

//描边绘制另一个矩形,边框颜色为深蓝到深红的线性渐变色
const linGrad2 = ctx.createLinearGradient(0, 0, 300, 300)
linGrad2.addColorStop(0, 'rgb(0, 0, 200)')
linGrad2.addColorStop(1, 'rgb(200, 0, 0)')
ctx.strokeStyle(linGrad2)
ctx.strokeRect(80, 80, 200, 200)
线型
除了颜色,还可以在描边绘制图形的时候,为描边的线条增加线型。
使用虚线
用 setLineDash 方法和 lineDashOffset 属性来制定虚线样式。 setLineDash 方法接受一个数组,来指定线段与间隙的交替;lineDashOffset 属性设置起始偏移量。
点击查看源码
js
//------------------蚂蚁线----------------
    const cxt3 = this.$refs.canvasView3;
    let offset = 0;
    cxt3.lineWidth(2);
    setInterval(() => {
      offset++;
      if (offset > 16) {
        offset = 0;
      }
      cxt3.clearRect(0, 0, 500, 500);
      cxt3.lineDashOffset(-offset);
      cxt3.setLineDash(8, 4);
      cxt3.strokeRect(10, 10, 280, 280);
      cxt3.drawAction('蚂蚁线');
    }, 1000);
组合使用
通过学习,我们为刚才绘制的快应用 logo 添加颜色和样式。
点击查看源码
js
	//------------------带颜色logo----------------
    const ctx6 = this.$refs.canvasView6;
    ctx6.beginPath();
    ctx6.moveTo(r * 2, r);
    ctx6.arc(r * 2, r * 2, r, -p / 2, -p, true);
    ctx6.lineTo(r, h - r * 2);
    ctx6.arc(r * 2, h - r * 2, r, p, p / 2, true);
    ctx6.lineTo(h - r * 2, h - r);
    ctx6.arc(h - r * 2, h - r * 2, r, p / 2, 0, true);
    ctx6.lineTo(h - r, r * 2);
    ctx6.arc(h - r * 2, r * 2, r, 0, -p / 2, true);
    ctx6.closePath();
    ctx6.stroke();
    ctx6.drawAction('绘制外边界');

    ctx6.beginPath();
    ctx6.moveTo(h / 2 + s, h / 2);
    ctx6.arc(h / 2, h / 2, s, 0, -p / 2 * 3, true);
    ctx6.arc(h / 2, h / 2 + s + s / 2, s / 2, -p / 2, p / 2, false);
    ctx6.arc(h / 2, h / 2, s * 2, -p / 2 * 3, 0, false);
    ctx6.arc(h / 2 + s + s / 2, h / 2, s / 2, 0, p, false);
    ctx6.fillStyle('#4285f5');
    ctx6.fill();
    ctx6.drawAction('绘制logo');

    ctx6.beginPath();
    ctx6.moveTo(h / 2 + s * 2, h / 2 + s + s / 2);
    ctx6.arc(h / 2 + s + s / 2, h / 2 + s + s / 2, s / 2, 0, p * 2, false);
    ctx6.fillStyle('#e94335');
    ctx6.fill();
    ctx6.drawAction('绘制logo');

    ctx6.beginPath();
    ctx6.moveTo(h / 2 + s / 4 * 3, h / 2 + s / 2);
    ctx6.arc(h / 2 + s / 2, h / 2 + s / 2, s / 4, 0, p * 2, false);
    ctx6.fillStyle('#f9bc05');
    ctx6.fill();
    ctx6.drawAction('绘制带颜色logo');
组合使用
通过学习,我们为刚才绘制的快应用 logo 添加渐变颜色和样式。
点击查看源码
js
 //--------------------------绘制渐变logo
    const ctx = this.$refs.canvasView10;
    const linGrad1 = new CanvasGradient(h, h, 0, 0);
    linGrad1.addColorStop(0, '#FFFAFA');
    linGrad1.addColorStop(0.8, '#E4C700');
    linGrad1.addColorStop(1, 'rgba(228,199,0,0)');

    ctx.fillStyle(linGrad1);
    ctx.fillRect(0, 0, h, h);
    ctx.drawAction('绘制背景颜色');

    const linGrad2 = new CanvasGradient(0, 0, h, h);
    linGrad2.addColorStop(0, '#C1FFC1');
    linGrad2.addColorStop(0.5, '#ffffff');
    linGrad2.addColorStop(1, '#00BFFF');

    ctx.beginPath();
    ctx.moveTo(r * 2, r);
    ctx.arc(r * 2, r * 2, r, -p / 2, -p, true);
    ctx.lineTo(r, h - r * 2);
    ctx.arc(r * 2, h - r * 2, r, p, p / 2, true);
    ctx.lineTo(h - r * 2, h - r);
    ctx.arc(h - r * 2, h - r * 2, r, p / 2, 0, true);
    ctx.lineTo(h - r, r * 2);
    ctx.arc(h - r * 2, r * 2, r, 0, -p / 2, true);
    ctx.closePath();
    ctx.lineWidth(10);
    ctx.strokeStyle(linGrad2);
    ctx.stroke();
    ctx.drawAction('绘制边框渐变');

    ctx.beginPath();
    ctx.moveTo(h / 2 + s, h / 2);
    ctx.arc(h / 2, h / 2, s, 0, -p / 2 * 3, true);
    ctx.arc(h / 2, h / 2 + s + s / 2, s / 2, -p / 2, p / 2, false);
    ctx.arc(h / 2, h / 2, s * 2, -p / 2 * 3, 0, false);
    ctx.arc(h / 2 + s + s / 2, h / 2, s / 2, 0, p, false);
    ctx.fillStyle('#4286f5');
    ctx.fill();
    ctx.drawAction('');

    ctx.beginPath();
    ctx.moveTo(h / 2 + s * 2, h / 2 + s + s / 2);
    ctx.arc(h / 2 + s + s / 2, h / 2 + s + s / 2, s / 2, 0, p * 2, false);
    ctx.fillStyle('rgb(234, 67, 53)');
    ctx.fill();
    ctx.drawAction('');

    ctx.beginPath();
    ctx.moveTo(h / 2 + s / 4 * 3, h / 2 + s / 2);
    ctx.arc(h / 2 + s / 2, h / 2 + s / 2, s / 4, 0, p * 2, false);
    ctx.fillStyle('rgba(250, 188, 5, 1)');
    ctx.fill();
    ctx.drawAction('渐变logo');
绘制文字
和绘制图形类似,快应用 canvas 也提供 fillText 和 strokeText 两种方法来绘制文字。
基本用法
点击查看源码
js
//填充绘制
ctx.fillText('Hello world', 10, 50)
文字样式
除了基本的样式,文字还提供了独有的样式。
字体(font)
可以直接使用符合 CSS font 语法的字符串作为文字样式的字体属性。默认值为 '10px sans-serif'。
要注意的是,不同于 web,目前快应用还无法引入外部字体文件,对于字体的选择,仅限 serif、sans-serif 和 monosapce。
对齐方式(textAlign)和 水平对齐方式(textBaseline)
这两个属性控制了文体相对与绘制定位点的对齐方式。
示例
点击查看源码
js
 //------------------绘制文字1----------------
const cxt = this.$refs.canvasView;
ctx.textAlign('left');
cxt.textBaseline('top')
ctx.font('48px sans-serif');
ctx.fillText('hello World', 10, 100);
ctx.drawAction('done');
合成与裁切 效果预览
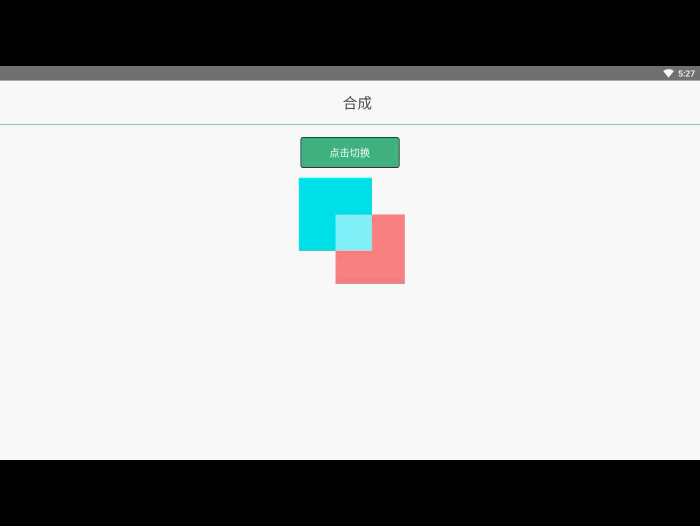
在之前的例子里面,我们总是将一个图形画在另一个之上,对于其他更多的情况,仅仅这样是远远不够的。比如,对合成的图形来说,绘制顺序会有限制。不过,我们可以利用 globalCompositeOperation 属性来改变这种状况。此外, clip 属性允许我们隐藏不想看到的部分图形。
合成
我们不仅可以在已有图形后面再画新图形,还可以用来遮盖指定区域,清除画布中的某些部分(清除区域不仅限于矩形,像 clearRect()方法做的那样)以及更多其他操作。
点击查看源码
js
globalCompositeOperation = type这个属性设定了在画新图形时采用的遮盖策略,其值是一个用于标识不同遮盖方式的字符串。
source-over
这是默认设置,并在现有画布上下文之上绘制新图形。
source-atop
新图形只在与现有画布内容重叠的地方绘制。
source-in
新图形只在新图形和目标画布重叠的地方绘制。其他的都是透明的。
source-out
在不与现有画布内容重叠的地方绘制新图形。
destination-over
在现有的画布内容后面绘制新的图形。
destination-atop
现有的画布只保留与新图形重叠的部分,新的图形是在画布内容后面绘制的。
destination-in
现有的画布内容保持在新图形和现有画布内容重叠的位置。其他的都是透明的。
destination-out
现有内容保持在新图形不重叠的地方。
lighter
两个重叠图形的颜色是通过颜色值相加来确定的。
copy
只显示新图形。
xor
图像中,那些重叠和正常绘制之外的其他地方是透明的。
点击查看源码
js
 changeGlobalCompositeOperation() {
      const globalCompositeOperationArr = ['source-over', 'source-atop',
        'source-in', 'source-out',
        'destination-over', 'destination-atop',
        'destination-in', 'destination-out',
        'lighter', 'copy', 'xor'];

      const index = globalCompositeOperationArr.indexOf(this.globalCompositeOperation);
      if (index < globalCompositeOperationArr.length - 1) {
        console.log("当前index============="+index)
        this.globalCompositeOperation = globalCompositeOperationArr[index + 1];
      } else {
        console.log("当前index 归0============="+index)
        this.globalCompositeOperation = globalCompositeOperationArr[0];
      }
      let str = this.globalCompositeOperation;
      const cxt = this.$refs.canvasView17;
      // 清除画布
      cxt.clearRect(0, 0, 320, 320); // 正常绘制第一个矩形
      cxt.fillStyle('#00E5EE');
      cxt.fillRect(10, 10, 200, 200); // 设置canvas的合成类型
      cxt.globalCompositeOperation(str); // 绘制第二个矩形
      cxt.fillStyle('rgba(255, 0, 0, 0.5)');
      cxt.fillRect(110, 110, 200, 200);
      cxt.drawAction('绘制指令 合成');
    }
裁切
裁切路径,就是用 clip 绘制一个不可见的图形。一旦设置好裁切路径,那么你在画布上新绘制的所有内容都将局限在该区域内,区域以外进行绘制是没有任何效果的。
已有的内容不受影响。
要取消裁切路径的效果,可以绘制一个和画布等大的矩形裁切路径。
点击查看源码
js
//绘制一个红色矩形
ctx.fillStyle('rgb(200,0,0)')
ctx.fillRect(20, 20, 200, 200)

//使用裁切路径绘制一个圆
ctx.beginPath()
ctx.arc(120, 120, 120, 0, Math.PI * 2, true)
ctx.clip()

//绘制一个蓝色矩形,超出圆形裁切路径之外的部分无法绘制
ctx.fillStyle('rgba(0, 0, 200)')
ctx.fillRect(80, 80, 200, 200)
变形
到目前位置,我们所有的绘制,都是基于标准坐标系来绘制的。
标准坐标系的特点是:
- 原点在左上角
- 尺寸与画布像素点 1:1
现在介绍的变形,就是改变标准坐标系的方法。
变形的基本方法
- 平移:translate(x, y)
- 旋转:rotate(angle)
- 缩放:scale(x, y)
- 变形:transform(m11, m12, m21, m22, dx, dy)、setTransform(m11, m12, m21, m22, dx, dy)、resetTransform()
变形的基本原则
- 不会改变已经绘制的图形
- 改变的是坐标系
- 变形之后的所有绘制将依照新的坐标系来绘制
状态保存与恢复
通过前面的学习,我可以看到,每次图形绘制其实都带着非常丰富的状态。
在绘制复杂图形的时候,就会带来重复获取样式的问题。
如何优化呢?
canvas 状态的保存与恢复
点击查看源码
js
ctx.save() //保存
ctx.restore() //恢复
canvas 状态就是当前所有样式的一个快照。
save 和 restore 方法是用来保存和恢复 canvas 状态的。
canvas 状态存储在栈中,每次 save 的时候,当前的状态就被推送到栈中保存。
一个 canvas 状态包括:
- strokeStyle, fillStyle, globalAlpha, lineWidth, lineCap, lineJoin, miterLimit 的值
- 当前的裁切路径
- 当前应用的变形
你可以调用任意多次 save 方法。
每一次调用 restore 方法,上一个保存的状态就从栈中弹出,所有设定都恢复。
点击查看源码
js
	 //------------------保存状态----------------
      const ctx = this.$refs.canvasView8;
      ctx.fillRect(20, 20, 200, 200); // 使用默认设置,即黑色样式,绘制一个矩形
      ctx.save(); // 保存当前黑色样式的状态
      ctx.fillStyle('#ff0000'); // 设置一个填充样式,红色
      ctx.fillRect(30, 30, 200, 200); // 使用红色样式绘制一个矩形
      ctx.save(); // 保存当前红色样式的状态
      ctx.fillStyle('#00ff00'); // 设置一个新的填充样式,绿色
      ctx.fillRect(40, 40, 200, 200); // 使用绿色样式绘制一个矩形
      ctx.restore(); // 取出栈顶的红色样式状态,恢复
      ctx.fillRect(50, 50, 200, 200); // 此时状态为红色样式,绘制一个矩形
      ctx.restore(); // 取出栈顶的黑色样式状态,恢复
      ctx.fillRect(60, 60, 200, 200); // 此时状态为黑色样式,绘制一个矩形
      ctx.drawAction('保存恢复');
基本步骤
在每一帧绘制的过程中,基本遵循以下步骤。
清空 canvas
除非接下来要画的内容会完全充满画布(例如背景图),否则你需要清空所有内容。最简单的做法就是用
clearRect。保存 canvas 状态
如果你要改变一些会改变 canvas 状态的设置(样式,变形之类的),又要在每画一帧之时都是原始状态的话,你需要先保存一下。
绘制动画图形(animated shapes)
这一步才是重绘动画帧。
恢复 canvas 状态
如果已经保存了 canvas 的状态,可以先恢复它,然后重绘下一帧。